Documenting#
PyAnsys documentation must not only be written but also maintained. If you are contributing to PyAnsys documentation, see the Google developer documentation style guide, which provides the general guidelines that you are to follow. This page supplies guidance specific to PyAnsys documentation.
Use this page as the entry point for documentation maintenance workflows.
Standards, API doc quality rules, and documentation style guidance.
Writing, editing, and reviewing user-facing documentation content.
For setup, build, deployment, versioning, and search behavior, continue on this page.
When writing developer documentation, the relationship between code and documentation is key. To keep documentation up to date with evolving code, always perform these tasks:
Minimize the content footprint.
Write timeless documentation.
Support contributions from both inside and outside of the development team.
Perform periodic reviews.
Understand documentation sources#
The generation of PyAnsys documentation uses Sphinx and the Ansys-branded Sphinx theme.
Sphinx assembles content from these sources:
Docstrings in Python (PY) files
reStructuredText (RST) files
Examples in PY or IPYNB files
Docstrings#
You must format docstrings in PY files so that Sphinx can parse them. Sphinx provides these extensions for docstring formatting:
Using the numpydoc extension is preferred because it supports an API
documentation structure with one page per method, providing Python community
members with documentation like that generated for the
NumPy and pandas packages.
If your API is very linear, you can use the napoleon extension because it supports
a documentation structure where everything needed to solve a certain problem can be
shown on one page.
The numpydoc manual explains how to use the
numpydocextension with Sphinx and includes a style guide.The
napoleonextension, which parses both numpydoc and Google style docstrings, refers you to the Google Python Style Guide.
Regardless of the extension that you choose for generating documentation from docstrings, using numpydoc-style docstrings ensures that there is consistency within PyAnsys libraries. For more information, see Documentation style.
reStructuredText files#
To provide general usage information in your documentation, use your favorite
editor to create reStructuredText (RST) files that you then place in
The doc directory. The index.rst file in the doc/source directory
defines the first level of your documentation hierarchy. The toctree
directive (which stands for “table of contents tree”) indicates the maximum
number of heading levels that the documentation is to display in the right navigation
pane.
Note
A directive is a generic block of explicit markup that sets off a specific block of text. For more information, see Directives in the Sphinx documentation.
The toctree directive also specifies the locations of the RST files for building
each section of your documentation.
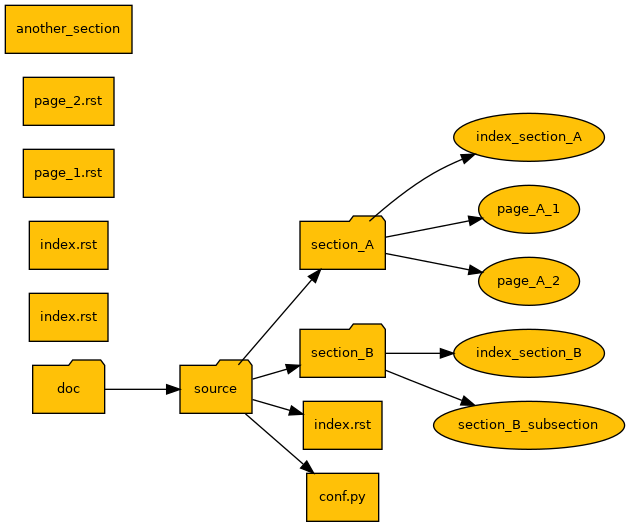
Fig. 1 Hierarchical structure for PyAnsys library documentation.#
As shown in the preceding figure, each documentation section has its own index.rst file.
However, to optimize web searches of the generated HTML documentation, the names of the
index files for sections should be short and descriptive, containing keywords and using
hyphens (-) as word separators. For more information, see Optimize web searches.
Here is an example of the hierarchical structure for RST files. The main index files is
named index.rst, and the index files for the documentation sections are named intro.rst.
Welcome to the library documentation
####################################

This is the content of the root `index.rst` file.

.. toctree::

    section-A/intro
    section-B/intro
Section A
#########

This is the content of the `section-A/intro.rst` file.

.. toctree::

    page-1
    page-2
    ...
Section B
#########

This is the content of the `section-B/intro.rst` file.

.. toctree::

    section_B_subsection
    ...
While you do not include the .rst extension when defining the section
structure in the toctree directive, the index file referenced for each
section should have a short descriptive name.
After you build documentation locally as described in Build documentation, the first-level heading in the index file for each section is shown as a clickable link in the documentation’s title bar. For more information on defining the documentation structure, see Getting Started in the Sphinx documentation.
Titles and headings in RST files#
As indicated in Capitalization in the Google developer documentation style guide, titles and headings are to be in sentence case. In RST files, the line that follows a title or heading is a string of characters of the same length as the heading or title. If the length of the characters is less than the length of the title or heading, Sphinx generates a warning.
For consistency within PyAnsys libraries, the use of these special characters is recommended but not enforced:
For section-level headings, use
###.For subsection-level headings, use
===.For subsubsection-level headings, use
---.For subsubsubsection-level headings, use
~~~.For paragraph-level headings, use
+++.
For comprehensive syntax information, see the reStructuredText Markup Specification.
Because you must be familiar with the content in this guide before contributing to
a PyAnsys library, explore its pages and then look at the RST files in the repository’s
doc/source directory. This should help you to understand the syntax and see how RST
files are nested to create the structure of this guide.
Recommended sections#
Although each PyAnsys library is different, its documentation has the same goal, which is to provide instructions and guidelines for users. Thus, you can find some common sections across the documentation for many PyAnsys libraries. Try to include these top-level sections in your library’s documentation:
Getting started: Explains how to install and set up the library.User guide: Describes how to use basic features of the library.API referenceDocuments API resources provided by the library.Examples: Provides fully fledged examples for using the library.Contribute: Refers to the PyAnsys developer’s guide for overall guidance and then provides library-specific contribution information.
For comprehensive information on writing content, see Content writing.
Examples#
Examples come in two formats:
Basic code snippets demonstrating features
Full-fledged standalone examples that are meant to be run as downloadable scripts
Place basic code snippets in RST files in the doc/source directory.
Place full-fledged standalone examples in the examples directory,
which is at the root of the repository. All of these examples must be compliant
with PEP 8. They are compiled dynamically during the build process.
Always ensure that your examples run properly locally because they are
verified through the CI performed by GitHub Actions.
Adding a new standalone example consists of placing it in an applicable
subdirectory in the examples directory. If none of the existing directories
match the category of your example, create a subdirectory with a
README.txt file describing the new category
Here is an example of what the structure for a PyAnsys library typically looks like:
.
├── doc
│   ├── conf.py
│   ├── index.rst
|   ├── make.bat
│   └── Makefile
├── my_python_module
│   ├── __init__.py
│   └── mod.py
└── examples
    ├── plot_example.py
    ├── example.py
    └── README.txt (or .rst)
In the Sphinx configuration file (doc/conf.py), enable the Sphinx-Gallery extension:
extensions = [
    ...
    'sphinx_gallery.gen_gallery',
    ]
The following configuration declares the location of the examples directory
to be ../examples and the output directory to be examples:
sphinx_gallery_conf = {
 'examples_dirs': '../examples',   # path to your example scripts
 'gallery_dirs': 'examples',  # path where the gallery generated outputs are to be saved
}
Because these examples are built using Sphinx-Gallery, you must follow its coding guidelines.
General example uses Python and Sphinx-Gallery.
Generate documentation without examples#
The documentation for some PyAnsys repositories is built using Sphinx-Gallery and includes examples generated with the assistance of Ansys products. Building documentation locally is time consuming in these cases, particularly if you need to test changes only in the documentation excluding the examples.
To generate documentation without examples, use command make html-noplot with
appropriate changes in make.bat and Makefile as mentioned below.
Refer sphinx-gallery documentation.
html-noplot:
  $(SPHINXBUILD) -D plot_gallery=0 -b html $(SPHINXOPTS) $(SOURCEDIR) $(BUILDDIR)/html
  @echo
  @echo "Build finished. The HTML pages are in $(BUILDDIR)/html."
:html-noplot
%SPHINXBUILD% -D plot_gallery=0 -b html %SOURCEDIR% %BUILDDIR%/html %SPHINXOPTS% %O%
Alternatively, you can modify sphinx_gallery_conf in conf.py as shown below
sphinx_gallery_conf = {
  ...
  'plot_gallery': 'False',
}
Generate documentation from docstrings#
You can use the native sphinx.ext.autodoc extension to generate documentation from the
docstrings in your Python files. When using this extension, you can include these directives
in your RST files:
automodule: For documenting modulesautoclass: For documenting classesautofunction: For documenting methods and functions
For a full list of auto directives, see Include documentation from docstrings in the Sphinx
documentation.
Document classes#
There are two main ways of using Sphinx to document a class:
Manually describe why and how you use a class in RST files.
Automatically generate documentation for classes using the
autoclassorautosummarydirective in RST files.
Manually generate documentation#
To describe why and how to use a class in RST files, use the
code-block directive:
Initialize ``my_module.MyClass`` with initial parameters. These
parameters are automatically assigned to the class.

.. code-block:: pycon

   >>> from my_module import MyClass
   >>> my_obj = MyClass(param1="apple", param2="orange")
   >>> my_obj.param1
   'apple'
Initialize my_module.MyClass with initial parameters. These
parameters are automatically assigned to the class.
>>> from my_module import MyClass
>>> my_obj = MyClass(param1="apple", param2="orange")
>>> my_obj.param1
'apple'
Automatically generate documentation#
To automatically generate class descriptions from the numpydoc strings in
your Python files, use either the autoclass or autosummary directive
in your RST files. For information on docstrings and required docstring
sections, see Numpydoc docstrings.
For simple classes, use the autoclass directive:
.. autoclass:: ansys_sphinx_theme.examples.samples.ExampleClass
   :members:
- class ansys_sphinx_theme.examples.samples.ExampleClass(param1, param2, param3=0)#
The summary line for a class docstring should fit on one line.
Attributes should be documented inline with the attribute’s declaration.
Properties created with the
@propertydecorator should be documented in the property’s getter method.- Parameters:
Examples
An example of how to initialize this class should be given.
>>> from ansys_sphinx_theme import samples
>>> example = samples.ExampleClass("mystr", ["apple", "orange"], 3)
- example_method(param1, param2)#
Class methods are similar to regular functions.
- Parameters:
- Returns:
Trueif successful,Falseotherwise.- Return type:
Notes
Do not include the
selfparameter in theParameterssection.Examples
>>> example.example_method("foo", "bar")
True
- property readonly_property: str#
Properties should be documented in their getter method.
Examples
>>> example.readonly_property
"readonly_property"
- property readwrite_property#
Set or return the readwrite property.
Properties with both a getter and setter should only be documented in their getter method.
If the setter method contains notable behavior, it should be mentioned here.
Examples
>>> example.readwrite_property
"readwrite_property"
>>> example.readwrite_property = "hello world"
>>> example.readwrite_property
'hello world'
For complex classes with many methods, use the autosummary directive:
.. autoclass:: ansys_sphinx_theme.examples.samples.Complex

.. autosummary::
   :toctree: api/

   ansys_sphinx_theme.examples.samples.Complex.real
   ansys_sphinx_theme.examples.samples.Complex.imag
   ansys_sphinx_theme.examples.samples.Complex.abs
- class ansys_sphinx_theme.examples.samples.Complex(real, imag=0.0)#
Custom implementation of a complex number.
- Parameters:
Examples
>>> my_num = Complex(real=1, imag=-1.0)
>>> my_num
(1.0 + 1.0j)
|
Real component of this complex number. |
|
Real component of this complex number. |
|
Return the absolute value of this number. |
When you use the autosummary directive, each class has its own dedicated page.
Each method and attribute in that class also has its own page.
Document multiple classes#
To document a set of small but highly cohesive classes, you can combine
the two preceding approaches. To accomplish this, you include multiple
autoclass directives in the same RST file with headings and text blocks as
necessary to describe the relationships between the classes.
For example, the Granta MI BoM Analytics library uses this combined approach:
Part compliance
first describes the
PartComplianceQuery
class. It then describes the
PartComplianceQueryResult
and
PartWithComplianceResult
classes returned by the query. Because the classes are only ever
encountered together in this context, they are documented on a
single page.
In contrast, the
RoHSIndicator
and
WatchListIndicator
classes are shared across multiple queries. Consequently, these classes are
documented separately.
Build documentation#
Sphinx is used to build the documentation. You configure the entire build process in The conf.py file.
The doc directory contains a Makefile file and a make.bat file for
automating the building process. Different builders render different
documentation output, such as HTML and PDF.
Build HTML documentation#
You can build HTML documentation locally with the command for your OS. On macOS
or Linux, you use Makefile. On Windows, you use the make.bat file.
make html
make.bat html
The resulting HTML files are created in the doc/_build/html directory.
To view the HTML documentation in your browser, navigate to this directory
and double-click the index.html file.
Use sphinx-autobuild to see your changes live#
The extension sphinx-autobuild allows you to see your changes live in the browser while you are editing the documentation. To use it, you must install it first:
pip install sphinx-autobuild
Then, you can run the following command to start a local server that automatically rebuilds the documentation. You can save the command in your make file for instance
autobuild:
  sphinx-autobuild "$(SOURCEDIR)" "$(BUILDDIR)/html" \
    $(SPHINXOPTS)
And then run
make autobuild
Build PDF documentation#
To build PDF documentation locally, you must add the following rules to
the Makefile and make.bat files:
.PHONY: pdf

pdf:
        @$(SPHINXBUILD) -M latex "$(SOURCEDIR)" "$(BUILDDIR)" $(SPHINXOPTS) $(O)
        cd $(BUILDDIR)/latex && latexmk -r latexmkrc -pdf *.tex -interaction=nonstopmode || true
        (test -f $(BUILDDIR)/latex/*.pdf && echo pdf exists) || exit 1
:PHONY pdf

:pdf
        %SPHINXBUILD% -M latex %SOURCEDIR% %BUILDDIR% %SPHINXOPTS% %O%
        cd "%BUILDDIR%\latex"
        pdflatex \*.tex --interaction=nonstopmode
You can then build the PDF documentation locally with the command for your OS:
make pdf
make.bat pdf
The resulting PDF and intermediate LaTeX files are created in the
doc/_build/latex directory.
Always verify the content of your PDF file.
Because warnings and errors that occur during the LaTeX building and rendering processes are ignored, it is possible that the PDF file has text formatting errors.
Enable multi-version documentation#
When your library has multi-version documentation enabled, the right side of the documentation’s title bar displays a drop-down button for switching between documentation versions. With this button, you can switch from viewing the documentation for the latest stable version to the documentation for the development version or a previously released version.
To take advantage of multi-version documentation, your library must use ansys/actions@v4 or later and be configured based on its level of maturity.
Upgrade to ansys/actions@v4 or later#
If your library uses an Ansys action earlier than ansys/actions@v4, upgrade
to a later version:
Update all your continuous integration YML files to use
ansys/actions@v4or later.Make sure that the
"json_url"key points tof"https://{cname}/versions.json".Note that the
release/substring is dropped.Apply the previous steps as fix patches in all versions that you want to include in your multi-version documentation.
Configure multi-version documentation#
Once your library uses ansys/actions@v4 or later, configure multi-version
documentation:
Ensure that you are using Ansys Sphinx Theme version 0.8 or later for building your library’s documentation.
Include the following lines in The conf.py file:
import os

from ansys_sphinx_theme import get_version_match


cname = os.getenv("DOCUMENTATION_CNAME", "<DEFAULT_CNAME>")
"""Canonical name (CNAME) of the webpage hosting the documentation."""

html_theme_options = {
    "switcher": {
        "json_url": f"https://{cname}/versions.json",
        "version_match": get_version_match(__version__),
    },
    ...
}
About the
DOCUMENTATION_CNAMEenvironment variableThe
DOCUMENTATION_CNAMEenvironment variable is expected to be declared in the YML file controlling the deployment of the documentation. The idea is that the canonical name is only defined in a single place, so it can be easily changed if required.Enable documentation deployment for development and stable versions. For more information, see Deploy documentation.
Once multi-version documentation is configured, its use is automated. Every time you release a new version, a link to the documentation for this version is added to the drop-down button.
If you require support for enabling multi-version documentation, email the PyAnsy Core team.
Deploy documentation#
PyAnsys libraries use GitHub Actions to deploy their documentation online to
GitHub Pages. This documentation is hosted on the gh-pages branch of the
library’s repository. Documentation deployment is done by uploading the
HTML documentation artifact to the gh-pages branch of the library’s repository.
For more information, see Creating a GitHub Pages site
in the GitHub documentation.
To automatically deploy both development and stable documentation, add the
doc-deploy-dev and doc-deploy-stable jobs to the ci_cd.yml file in
the .github/workflows directory:
env:
  DOCUMENTATION_CNAME: '<library>.docs.pyansys.com'

jobs:

    # Artifacts for HTML documentation need to be generated before
    # executing the deployment jobs

    doc-deploy-dev:
      name: "Deploy development documentation"
      # Deploy development only when merging or pushing to the 'main' branch
      if: github.event_name == 'push' && !contains(github.ref, 'refs/tags')
      runs-on: ubuntu-latest
      needs: build-library
      steps:
        - uses: ansys/actions/doc-deploy-dev@v6
          with:
            doc-artifact-name: '<html-artifact-name>'
            cname: ${{ env.DOCUMENTATION_CNAME }}
            token: ${{ secrets.GITHUB_TOKEN }}

    doc-deploy-stable:
      name: "Deploy stable documentation"
      # Deploy release documentation when creating a new tag
      if: github.event_name == 'push' && contains(github.ref, 'refs/tags')
      runs-on: ubuntu-latest
      needs: release
      steps:
        - uses: ansys/actions/doc-deploy-stable@v6
          with:
            doc-artifact-name: '<html-artifact-name>'
            cname: ${{ env.DOCUMENTATION_CNAME }}
            token: ${{ secrets.GITHUB_TOKEN }}
Deploy to another repository#
If you are planning to deploy documentation to a repository other than the one for your library, make sure that you create this repository before deploying your documentation for the first time.
Using the {{ secrets.GITHUB_TOKEN }} token when deploying to another repository is
not possible due to the level of credentials of this token. Instead, use the
secrets generated by the PyAnsy Bot app.
For deploying the documentation to another repository, use this workflow:
env:
  DOCUMENTATION_CNAME: '<library>.docs.pyansys.com'
  DOCUMENTATION_REPOSITORY: '<organization-name>/<repository-name>'

jobs:

    # Artifacts for HTML documentation need to be generated before
    # executing the deployment jobs

    generate-token:
      name: "Generate deployment token"
      id: get_workflow_token
      uses: peter-murray/workflow-application-token-action@v1
      with:
        application_id: ${{ secrets.BOT_APPLICATION_ID }}
        application_private_key: ${{ secrets.BOT_APPLICATION_PRIVATE_KEY }}

    doc-deploy-dev:
      name: "Deploy development documentation"
      # Deploy development only when merging or pushing to the 'main' branch
      if: github.event_name == 'push' && !contains(github.ref, 'refs/tags')
      runs-on: ubuntu-latest
      needs: build-library
      steps:
        - uses: ansys/actions/doc-deploy-dev@v6
          with:
            doc-artifact-name: '<html-artifact-name>'
            cname: ${{ env.DOCUMENTATION_CNAME }}
            token: ${{ steps.get_workflow_token.outputs.token }}
            external-repository: ${{ env.DOCUMENTATION_REPOSITORY }}

    doc-deploy-stable:
      name: "Deploy stable documentation"
      # Deploy release documentation when creating a new tag
      if: github.event_name == 'push' && contains(github.ref, 'refs/tags')
      runs-on: ubuntu-latest
      needs: release
      steps:
        - uses: ansys/actions/doc-deploy-stable@v6
          with:
            doc-artifact-name: '<html-artifact-name>'
            cname: ${{ env.DOCUMENTATION_CNAME }}
            token: ${{ steps.get_workflow_token.outputs.token }}
            external-repository: ${{ env.DOCUMENTATION_REPOSITORY }}
Access online documentation#
Documentation for the latest stable release of a PyAnsys library is accessible from its repository. The canonical name for the documentation is constructed using this structure:
https://<product>.docs.pyansys.com
If a library does not have multi-version documentation enabled, you can generally
access the latest development version of the documentation by adding dev to
the URL:
https://<product>.docs.pyansys.com/dev
However, most libraries do have multi-version documentation enabled, which means that stable and development versions are collected under the same website.
For example, consider the PyAEDT documentation: On the right side of the title bar for its documentation, you use the drop-down button to select the version of the documentation.
The URL for documentation of the latest stable version is https://aedt.docs.pyansys.com/version/stable/index.html.
The URL for documentation of the latest development version is https://aedt.docs.pyansys.com/version/dev/index.html.
Ansys actions are GitHub Actions for automatically keeping the latest development versions of both the library and its documentation up to date.
To make documentation changes, you create a branch with a name that begins with
a prefix of doc/ that is then followed by a short description of what you
are changing. For more information, see Branching model.
As you are making changes in this branch, you want to periodically generate the documentation locally so that you can test your changes before you create a GitHub pull request. For more information, see Build documentation.
Optimize web searches#
It’s important that web searches rank PyAnsys documentation pages high in organic search results. The PyAnsys Core team has identified some challenges in regard to search engine optimization (SE0):
The
robots.txtfile in the root directory of your documentation website blocks Google and other search engines from crawling some pages. This file tells web robots about the structure of the documentation website.Missing canonical tags result in duplicate pages being found.
For multi-version documentation, redirection from the base
index.htmlfile to theversion/stable/index.htmlfile causes problems.
To resolve these SEO challenges, upgrade your documentation deployment actions to
doc-deploy-stable@v6 and doc-deploy-dev@v6 or higher.
Here’s how using the latest doc-deploy actions automatically address these SEO challenges:
They generate a corrected
robots.txtthat allows Google and other search engines to crawl all your documentation pages.They add
rel="canonical"tags, which are HTML elements, in the head sections of HTML pages. A canonical tag prevents duplicate content issues by specifying the preferred (canonical) URL for a group of pages that have the same or very similar content. Search engines use the canonical tag to determine the best representation of a page. Here is an example of a conical tag:<link rel="canonical" href="http://www.example.com/">They copy
gh-pages/version/stable/index.htmltogh-pages/index.htmland prepend local references withversion/stable/, which eliminates the need for redirection.
SEO tips#
Here are additional SEO tips for ensuring that Google and other search engines rank your documentation pages higher in search results:
Avoid having
index.htmlpages (except for the main one for your documentation).Sphinx, which renders files named
index.rstinto pages namedindex.html, always generates absolute links. For example, the absolute link forpage/index.rstispage/index.html. Google prefers links to pages that do not end withindex.html.Use lowercase for names of directories and files and separate words with hyphens.
While these naming conventions might be difficult to achieve for auto-generated files matching the names of classes, following these naming guidelines when possible makes file searches easier and search results more useful. For comprehensive information, see Filenames and file types in the Google developer documentation style guide.
Use short filenames containing keywords.
Avoid Ansys-specific words in filenames. Use a keyword generator like ahrefs to find relevant keywords that potential users who are searching for information are likely to use.
SEO naming examples#
This table shows how to use the preceding tips to rename example files. While the source files for examples are generally Python (PY) or Jupyter Notebook (IPYNB) files, Sphinx converts them to reStructuredText (RST) files for inclusion in the documentation.
Not recommended |
Recommended |
|
|---|---|---|
examples/hohmann-transfer-using-targeter.rst |
examples-hohmann-transfer-{orbit,calculator}.rst |
|
examples/00-mapdl-examples/transient_thermal.py |
examples-transient-thermal-{analysis,simulation}.py |
|
examples/02-HFSS/HFSS_Spiral.py |
examples-design-and-simulation-of-spiral-inductors.py |
|
If you have questions about SEO, email the PyAnsys Core team.
Facilitating contributions in the form of examples#
A common challenge in libraries is the lack of examples. Examples are critical for users to understand how to use the library and present new functionality. They also serve as a mechanism to educate users on best practices.
To encourage contributions of examples, it is important to provide a clear structure for contributors to follow. The build process should also be straightforward.
Three best practices for examples are:
Providing a template: Ensures that contributors follow a consistent structure and simplifies the process of getting started. The template should include all necessary information, such as the name of the example, a description, and the code itself.
Verifying the example: Ensures that the example works as expected and helps catch errors before submission. The verification process should involve running the example and checking the output. If the example fails, it should be easy to identify and fix the issue.
Making the example usable in multiple contexts: Ensures that the example can be usable by a user reading the documentation, an application engineer using the library through a notebook, or a developer including the example to the documentation.
Providing a template#
Here are examples of how to promote the use of templates for examples:
These templates are also referenced in the contributing guidelines:
Verifying examples#
The verification process depends on the library and the tools used for generating the examples. Within the PyAnsys ecosystem, Sphinx Gallery and NBSphinx are commonly used to generate examples, with slightly different build processes for each library.
The following approach can be applied across libraries:
Create a
Makefiletarget that runs a specific example.
This target is used to execute the example and check the output. Only one example is build in this
case, making it very useful for documentation builds that last very long. If the example fails,
it should be straightforward to identify and resolve the issue. For instance, PyAnsys Geometry
includes a make target for this purpose:
./make.bat single-example examples/01_getting_started/01_math.mystnb
make single-example examples/01_getting_started/01_math.mystnb
The pull request introducing this feature is: PyAnsys Geometry PR #1893 This implementation is specific to NB Sphinx, but the concept of creating a target to run a specific example and verify its output can be adapted to other libraries.
Making the example usable in multiple contexts#
A core objective when designing examples is to ensure they can be used seamlessly across multiple contexts: whether it is by end users exploring them interactively, by documentation tools rendering them for the web, or by engineers verifying their correctness and updating them. Achieving this flexibility requires a careful balance between accessibility, structure, and maintainability.
A recommended approach to support this goal is to author and maintain examples as plain Python scripts, but using Jupytext to treat those scripts as notebooks when needed. Formatting your examples using the Jupytext light format makes them fully compatible with JupyterLab, where they can be opened, edited, and executed just like traditional notebooks - all without needing a IPYNB file. Here is an example of a Jupytext light format script:
# # Dipole antenna
#
# Keywords: **HFSS**, **antenna**, **3D component**, **far field**.
#
# ## Prerequisites
#
# ### Perform imports
#
# Import the packages required to run this example.

# +
import os
import tempfile
import time

from ansys.aedt.core import Hfss

# -

# ### Define constants
# Constants help ensure consistency and avoid repetition throughout the example.

AEDT_VERSION = "2025.1"
NUM_CORES = 4
NG_MODE = False  # Open AEDT UI when it is launched.
Here are examples of PyAnsys projects using this approach: